Setting Up Home Internet Connection: A Step-by-Step Guide
Step 1: Choose Your Internet Service Provider (ISP)
The first step in getting internet access where you live is choosing the right internet service provider (ISP). There are several options available, including cable, DSL, fiber, and satellite internet providers. Each has its own strengths and weaknesses, so it's essential to research and compare plans before making a decision.
Types of Internet Service Providers (ISPs)
- Cable Internet Providers: These ISPs use the same cables that bring television signals into your home to provide internet access.
- DSL Internet Providers: These ISPs use phone lines to deliver internet access.
- Fiber Internet Providers: These ISPs use fiber-optic cables to deliver high-speed internet access.
- Satellite Internet Providers: These ISPs use satellites in orbit to deliver internet access.
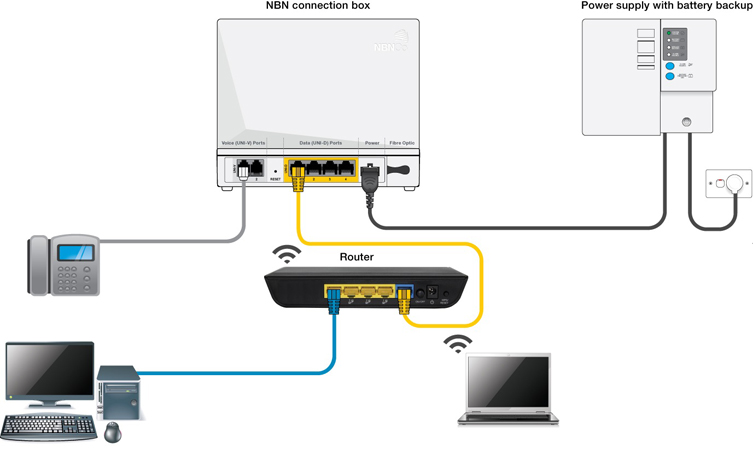
Step 2: Connect Your Modem and Router
Once you've chosen your ISP, the next step is to connect your modem and router to the wall jack and power outlet. Most ISPs provide a modem and router as part of their service package. However, if you already have your own modem and router, make sure they are compatible with your ISP's network.

- First, locate the wall jack and power outlet where your modem and router will be installed.
- Connect the modem to the wall jack using the provided Ethernet cable.
- Connect the router to the modem using another Ethernet cable.
- Connect the router to a power outlet to turn it on.
Step 3: Set Up Your Wi-Fi Network
After connecting your modem and router, the next step is to set up your Wi-Fi network. This involves choosing a network name, also known as an SSID, and a password to secure your network. You can usually access your router's settings by opening a web browser and typing in the router's IP address, which is usually 192.168.0.1 or 192.168.1.1.
How to Set Up Your Wi-Fi Network
- Open a web browser and type in the router's IP address to access its settings.
- Choose a network name and password for your Wi-Fi network.
- Save your changes and restart the router to apply the new settings.
Step 4: Connect Your Devices to the Wi-Fi Network
After setting up your Wi-Fi network, the next step is to connect all your devices to the network. This includes your computer, smartphone, tablet, smart TV, and any other devices that require an internet connection.
- Make sure your devices are turned on and in range of the router.
- Open the Wi-Fi settings on each device and select the network name you created in Step 3.
- Enter the password you created in Step 3 to connect to the network.
Issue 1: Slow Internet Speed
Slow internet speed can be frustrating, but there are several solutions to help you speed up your connection. These include:
- Upgrading your internet plan to a faster speed.
- Restarting your router to clear out any cached data.
- Using a Wi-Fi range extender to boost your signal.
Issue 2: Unstable Wi-Fi Connection

- Changing the channel on your router to minimize interference.
- Moving your router to a centralized location to improve signal strength.
- Upgrading to a mesh network system to provide a stronger and more stable connection.
By following these steps and troubleshooting tips, you'll be able to set up a reliable and fast home internet connection that meets your needs.
Final Tips
Regularly updating your router's firmware can help ensure it's running with the latest security patches and features.
Tip 2: Use a Strong and Unique Password
Using a strong and unique password can help protect your network from unauthorized access.
By following these tips and troubleshooting your home internet connection, you'll be able to enjoy fast and reliable internet access in the comfort of your own home.


